Giveaway – Tidal Lace fat quarters

Leave a comment to win this entire gorgeous group of fat quarters from the Tidal Lace collection by Kim Andersson for Windham Fabrics. Share your favorite quick sewing project in your post.

Leave a comment to win this entire gorgeous group of fat quarters from the Tidal Lace collection by Kim Andersson for Windham Fabrics. Share your favorite quick sewing project in your post.


The Tidal Lace Blog Hop continues!

See my previous post for a quick pillow project tutorial.

Tidal Lace Pillow

Check out the rest of the AMAZING projects created with this gorgeous fabric.

Sept. 15-23rd.

Sept. 15-23rd.


Here are the links for all the participating sites:

Mon 15th Sept:
Windham Fabrics
Kim Andersson : I Adore Pattern
Tues 16th Sept:
Erin Harris : House on Hill Road
Amy Gunson : Badskirt
Cath Mosley on Instagram
Wed 17th Sept:
Anne Sullivan : Play Crafts
Stacey Day : Stacey In Stitches
Thurs 18th Sept:
Adrianne Ove : Little Bluebell
Terri Carpenter : The Quilted Fox
Friday 19th Sept:
See How We Sew
Amanda Hohnstreiter : My Sewcial Hour
Sat 20th Sept:
Ann Haley : Sew Messy
Madeleine Roberg : Domestic Strata
Sunday 21st Sept:
Cal Patch : Hodge Podge Farm
Rebecca Ringquist : Drop Cloth
Monday 22nd Sept:
Alicia Wietholter : Swoon Patterns
Stacey Sharman : Peppermint Pinwheels
Tuesday 23rd Sept:
Jen Carlton Bailly : Bettycrockerass
Miriam Blaich : The Berlin Quilter
Sew on – – – – – – – – – –
Ann


Tidal Lace pillow – FREE TUTORIAL


Tidal Lace pillow by An n Haley

Tidal Lace pillow by Ann Haley


This quick pillow utilizes Kim Andersson’s new Tidal Lace fabric collection for Windham Fabrics. It’s a great beginner project or a quick gift for someone special.

Here is the skinny . . .

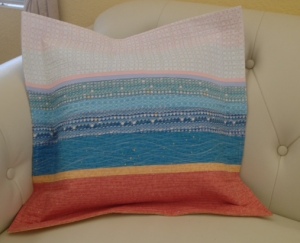
Cut 21″-long strips of fabric in various widths. I used the earthy tones in the collection near the bottom of the pillow top, watery fabrics in the center part and the airy colors near the top. Join enough strips to form a square 21″ x 21″.

TIP: Adding a narrow strip or two creates drama.  In this picture, you can see light blue and light pink strips. Each of these narrow strips was cut 3/4" x 21". Then I sewed them using a 1/4" seam allowance, so they finish 1/4" wide.

TIP: Adding a narrow strip or two creates drama. In this picture, you can see light blue and light pink strips. Each of these narrow strips was cut 3/4″ x 21″. Then I sewed them using a 1/4″ seam allowance, so they finish 1/4″ wide.

Cut a piece of muslin 24″ x 24″ and a piece of batting 24″ x 24″. Place the batting on top of the muslin, then center the stripped pillow top with right side facing up, on the batting. Hand baste the 3 layers together using random 2″-long stitches to hold the layers together. You can pin baste the layers, but I think hand basting holds them in place better. With a small project like this, hand basting will only take a few minutes.

Quilt the pillow top sandwich in long wavy lines from one side of the square to the other. I used a walking foot and gently moved the fabric from side to side as the machine sewed. My wavy lines were more wavy at the bottom of the pillow top and more straight near the top. Quilt the heck out of it. I am not a proficient machine quilter, but this was a piece of cake and added great texture to the pillow.

Quilt the pillow top by crisscrossing rippled lines of stitches.

Quilt the pillow top by crisscrossing rippled lines of stitches.

The stitches near the top of the quilt are now as wavy.


Trim the muslin and backing even with the quilt top. Make sure the pillow top sandwich is square and measures about 21″ x 21″. Set aside for now.

The pillow back is made of 2 overlapping panels. These panels can also be pieced. Each panel should be 21″ high and 15″ wide. Once the 2 panels are pieced and trimmed to 15″ x 21″, fuse a lightweight interfacing on the wrong side of each panel. This will give the fabic a nice weight and hold the panels flat. Do not use medium or heavyweight interfacing or the back will gape open. (Trust me on this.)

Tidal Lace pillow back

On each back panel, turn one 21″ edge under 1/2″ and press. Turn this same edge of each panel under 2″ and press. Topstitch the pressed edge of each panel to hold the folds in place.

Overlap the folded edge of one back panel over the folded edge of the other panel by about 4″ and pin together. The pinned pieces should form a square about 21″ x 21″. If you need to, adjust the overlap to get this measurement. Machine baste across the top and bottom of the back, where the panels overlap.

Place the pillow back right side up on your table. Put the quilted pillow front face down on the pillow back, so the pillow front and back are right sides together. Pin and stitch all four sides using a 1/2″ seam allowance.

Turn the pillow cover right side out and press the outer seams and corners. If everything looks hunky-dory, turn it inside out again and trim the outer seam allowance to a scant 1/4″. I always like to make sure everything looks good on the outside before I trim a seam! Turn right side out and press one last time.

You can insert a 20″ x 20″ pillow form now and your done – congrats!

IF you want to create a flange around the outer edge of the pillow, read on . . .

A 2" seam is sewn around the outside of the finished pillow to create a flange. Then a smaller, 16" x 16" pillow form is inserted.

A 2″ seam is sewn around the outside of the finished pillow to create a flange. Then a smaller, 16″ x 16″ pillow form is inserted.

This photo of the pillow back shows the flange well. To create this outer flap, begin by topstitching 1/4″ from the edge of the pressed pillow cover.

Sew another row of stitches 2″ from the outer edges of the pillow cover. I taped a ruler to the bed of my sewing machine 2″ from the needle. See my previous post on Wide Seams for a more detailed explanation. This really helped me sew a straight line!

Add-a-Quarter ruler as a seam guide

Add-a-Quarter ruler as a seam guide

That’s all there is to creating a “flange”! Insert a 16″ x 16″ pillow form through the opening in the back and take pictures!
Tidal Lace Pillow

Here are a couple other ideas I had while playing with Kim Andersson’s Tidal Lace fabrics. This awesome fabric collection will make its appearance at your local quilt shop in January ’15.

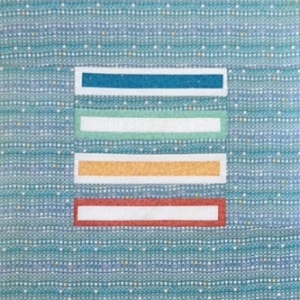
For a modern looking pillow, I started with simple rectangles and added narrow strips around each. Then I used a great Tidal Lace print to fill in the rest of the pillow top. I will add simple channels of stitches when quilting this pillow top.
Tidal Bar pillow top by Ann Haley

Another idea I was toying with was to add wavy bias strips of fabric to a simple strip-pieced background. These bias strips haven’t been sewn down yet, but you can see the “painterly” effect that can be achieved.

Bias strips of fabric to be sewn to a pieced background

Bias strips of fabric to be sewn to a pieced background

Pillows are a great way to try new ideas while creating a nice finished piece. Have fun!

WIDE seams Tip

I was making a pillow with Wyndham’s new fabric collection by Kim Andersson, called Tidal Lace. It’s gorgeous and I can’t wait to show you; but wait you must, sorry. Kim and Wyndham are doing a blog hop in September, so I should be able to unveil the pillow then.

For this pillow, I wanted to stitch 2″ from the outer edge, to create a flange. I taped my Add a Quarter ruler to the bed of my sewing machine, 2″ to the right of the needle  –  and voila, instant seam guide! See how easy it was to sew exactly 2″ from the edge? It was like having a 2″ presser foot.

Add a Quarter ruler as a seam guide

Add a Quarter ruler as a seam guide

As you can see in this second photo, I also drew a mark 2″ in front of the needle, so I would know when to pivot. (The mark is on the masking tape which holds the ruler to the machine bed.)

Cool, huh?

Close up of ruler, showing the 2" mark in front of the needle.

Close up of ruler, showing the 2″ mark in front of the needle

Anti-perfectionism creations

Lately I’ve been into what I think of as “instant gratification creations”. I just do whatever is quick and easy, rather than obsessing about doing it “right”.

So I needed a quick label for my skyline quilt. I used a pencil to sketch a skyline and added my name and contact info, then copied it onto fabric. I touched up the fabric copy with an ultra-fine Sharpie pen. That’s it!

You know what? I like it more than any quilt label I’ve ever done.

An easy way to create a custom label for your quilt

An easy way to create a custom label for your quilt

Skyline block quilt tutorial

Blocks from Simply Solids bee on flickr using my tutorial on sportsew.wordpress.com

Blocks from Simply Solids bee on flickr using my tutorial on sportsew.wordpress.com

Skyline block quilt tutorial

I am almost finished with my Skyline quilt – yay! I posted the basic block tutorial on my other blog – sportsew.wordpress.com if you are interested in looking at it.

The quilt needs to be hung tomorrow night at Stitch Modern in Oakland, CA, so “almost finished” is not good enough and I’m starting to panic.

I’ll post a picture of it as soon as it’s quilted, but I wanted to remind you that the tutorial is on my other blog. Here is a picture of a basic block. Last March, I designed this block for my online quilting bee Simply Solids on Flickr. The fabulous women in my bee took the basic concept and produced some amazing variations.

The blocks are pinned to the wall in this photo. I’ve altered the layout since then because I thought they looked a little like books on a bookshelf.

More to come, stay tuned . . .

Quilt binding dispenser

20140114-100356.jpg

This is a follow up to my previous post about wrapping quilt binding around a cardboard tube. If you recall, I concluded in my last post that any old cardboard tube (from wrapping paper, paper towels or even toilet paper) works just fine for storing quilt binding.

I discovered that placing the tube on my sewing machine’s second spool made it easy to pull out just the amount I need. What an awesome way to keep the binding from getting tangled and mangled.

If you don’t have an extra thread spindle on your machine, use a vertical paper towel holder.

Since I had wrapped my binding on a large wrapping paper tube left over from the holidays, I placed a large spool of thread on the spindle then slid the cardboard over the spool. The big spool of thread kept the tube steady.

Give it a try, you will use this tip again and again.

Stitch on – – – –
Ann